Moving Marine Aquariums Part 1
Moving. The word fairly screams stress. Even if you dont have an aquarium, moving is hardly a fun experience. However, if you do have an aquarium, moving can be a miserable endeavor. This article is for those who are facing this daunting task, and are unsure about how to get it done. It seems to be sensible to begin with moving a reef tank set up, as that is about the most complicated system most people are likely to run.
In my opinion, planning well is the most critical factor for success. If you set out with a clear group of goals, you can lay the early foundation for a successful move. Obviously, the most important goal is to keep your livestock alive and healthy. Beyond that, it is more than worth trying to maintain the integrity of the biological filtration. In a saltwater tank, that means keeping the live rock and live sand alive and undisturbed. By following a series of measures, you can ensure a quick and easy move without losing any of your animals.
Clearly, the name of the game is survival. There is no point to the preparatory process if you lose livestock along the way. Preventing the unnecessary loss of life is a paramount concern when making the move. Here is where planning pays off the most.
First, you must decide if the distance you are moving necessitates bucketing or bagging livestock. Whenever possible, I suggest using 5 gallon buckets filled with about 1.5 gallons of water. A battery powered pump with air-line and a balsa wood airstone should suffice to keep the water in the bucket moving and well-oxygenated. Short distance moves might not require the use of a heat supply but longer distances will surely necessitate heat packs and/or insulated containers (see step 2).
Things to think about:
Keeping your livestock at temperature
Preparing replacement water in advance
The new location of the tank
Minimizing disturbance of the sand (especially a deep sand bed)
The timing and distance of the move
Taking the opportunity to change the setup (if desired)
Materials/equipment needed
Items you will need:
Tape measure
5 gallon buckets
Plastic wrap
Siphon hose
Fish bags
Battery powered air pump w/ airline
Extra salt water (100% of system volume)
Extra RO/DI water
Fish net
Rubber bands
Trash bags
Bathtub and/or sink
Electronic thermometer
A good helper
Step 1: Preparation at the New House
This is the stage where the battle will be won or lost. Good preparation and a thoughtful approach will make the effort easier, faster, and safer for your livestock. You will need to make several decisions at this point in time. For example, will you be switching out tanks for a bigger or newer one? Does the move require you to breakdown equipment or plumbing in such a way that it will be time consuming to reconstruct things? Where will the tank be located in your new house? How far is the travel from the old house to the new house? Each unique situation will bring its own considerations, but I am guessing that you get the gist.
I find it useful to start with the question of location. When I am deciding on the spot, I use four criteria: 1) Exposure to direct sunlight must be minimized; 2) Other furniture must fit in the room as well; 3) Close access to a good power outlet (preferably with built-in GFCI protection); 4) Maintaining maximum distance from any fireplaces, woodstoves, or HVAC outlets or returns.
Once you have decided the location and determined that your system physically fits in the spot (dont forget that measuring tape!), you can move on to the specifications of the new system (henceforth, I will refer to the tank at the old house as the old system and the tank at the new house as the new system). If it is necessary to create new plumbing, I recommend measuring, cutting, and dry fitting (or gluing wherever possible) the new pipes ahead of time. In the event that you are simply moving the old system and keeping it identical at the new house, it should be easy enough to fabricate the new plumbing, using the old as a template.
On the move day, be sure to have enough clean saltwater to be able to fill the entire system. You wont need to use all the clean water, but it pays to make you sure you dont run out in the middle of the move. If you have access to an additional tank of sufficient size, you can fill that with the clean water the night before and bring it up to temp with aquarium heaters. Otherwise, it works well to fill 5 gallon water jugs with clean water and place them in a hot water bath in the bathtub and/or sink. This method will quickly bring the clean water up to temperature, while also helping to maintain the warmth while you are bringing the old system over.
Step 2: Breaking Down the Old System
Start by shutting off all life support systems. Once this step has been taken, all subsequent maneuvers must be completed in a quick and efficient manner. The main risks to your livestock will be de-oxygenation in the water and dropping temperatures.
FILL A COOLER TO ABOUT 1/5 FULL, using tank temperature water from the tap. Using the cooler and a warm water bath will enable you to float a number of fish bags in an insulated environment. In this manner, they will be much slower to cool down and less likely to be jostled during the move.
BAG LOOSE CORALS OTHER INVERTEBRATES. If you have corals that can be safely removed from the substrate, it is advisable to do so. If they are free-living or loosely attached, they will be better served by being bagged. Once bagged, they can be floated in the cooler. Other inverts, such as crabs and snails, can be placed several to a bag (snails with snails and crabs with crabs, of course).
BEGIN MOVING LIVE ROCK. Start by giving several inches of tank water to a bucket, then begin placing the uppermost live rock into the bucket (dont remove any that are buried in the sand). If coral, sponges, or other invertebrates are on the live rock, take care to move them carefully and place the rock so that the inverts are upward. Often, you can use 2-4 chunks of rock covering the bottom in a layer. Place them so that they wedge each other into a position where none can move. Remember, small fish like gobies and damsels may try to hide within the rock structures. Be sure to check for them before taking the rock out of the water. If your buckets have lids, secure them in place before driving away with them. If not, wrap the buckets in trashbags, taped tightly around the rim like a drum to prevent splashing.
KEEPING SPONGES SUBMERGED. Some sponges will die if exposed to air, others will not. However, it is not worth risking exposing any sponges to air, and an easy way exists to avoid doing so. If the sponge cannot be removed from the live rock, the piece can be held upside down over a submerged plastic dish. Keep the sponge submerged in the dish while holding the rock chunk by its underside will enable you to lift both as a unit. Simply lower it all into a pre-watered bucket and the sponge is never exposed. This technique will work with sensitive corals as well.
BAG FISH. I have included this step further down the list but you will likely need to begin bagging fish immediately. If they are easy to catch there is no reason not to remove them first. Nonetheless, with all of the vertical structure removed from the tank it will be easier to catch most fish. In the case of difficult to catch, fish you might need to go to great lengths to net them. A fish trap is an option, but may take days to entice the fish. If there is a fish, such as a goby, which hides in the sand beneath a rock, you will need to remove that rock. Lift it very slowly, without shaking it around. You should be able to encourage the fish out from underneath, so that it can be netted. Then gingerly set the rock back into place, disturbing as little of the sand as possible.
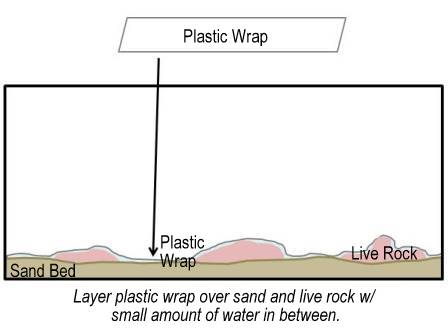
SAND BED CARE. Drain the water down until there is just enough water left to cover the sand in a thin layer (keeping about 25% for re-use later). Use non-toxic, food-safe plastic wrap to create a seal on the waters surface. Place the wrap directly on the water, with several inches extending up the sides of the tank. Take care not to trap any air bubbles. The plastic-wrap will seal in moisture for the remaining live rock, as well as prevent sloshing water from disturbing the sand. The sand bed within the display tank, if it is composed of aragonite, will likely have fine sediment and waste between its grains. These particles are light and easily put into suspension in the tank water, making it cloudy and dirty. If the sand is a shallow layer, less than 2 inches, there is little to fear from problems such as hydrogen sulfide release. However, deeper areas of the sand, such as a deep sand bed or a plenum, may contain the highly toxic substance. The presence of a black band deep with the sand is an indication that this chemical is present, as well as the strong odor of rotten eggs (in the event that disturbed sand releases hydrogen sulfide, discard the sand and the water, and restart the sand bed from scratchyour live rock should provide plenty of biological filtration until the new sand is colonized).